


Your monthly planting guide, composting tips, cool chicks & more
Edition 1: Mid-May 2024

In this newsletter:
Compost like your harvest depends on it
May & June planting guide
Transplanting fruit trees
Keeping chickens cool for the summer
Cassava banana bread recipe
Bad farming advice, internet scams & general WTF
Sneak peek at your June 1 newsletter
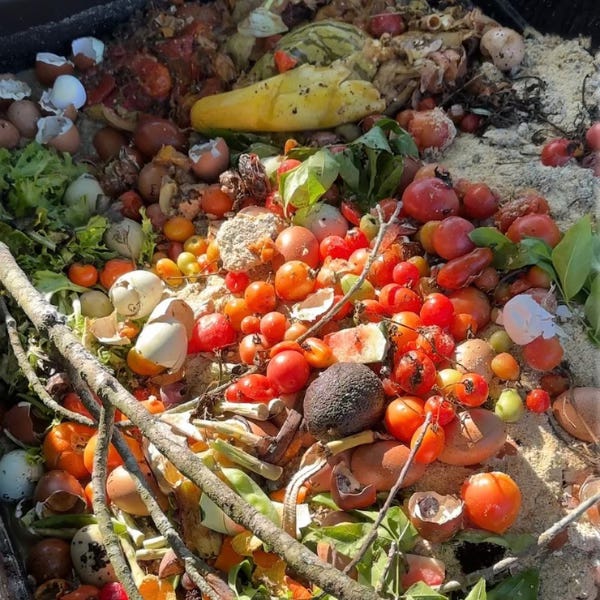
Compost Like Your Harvest Depends On It
One of the biggest and earliest mistakes I see new gardeners make both financially and garden health-wise is purchasing poor quality, overpriced bagged soil. Soil is literally the foundation of an abundant garden and will make or break your gardening experience.
Composting at home and/or purchasing bulk compost from a local nursery or farmer, instead of buying bagged soil mixes from a big box store, will save you money and give you a more abundant harvest. It’s also better for your local economy and has a much lower carbon footprint.
Composting is beneficial because it’s:
Full of balanced nutrients essential to plant growth and food production
Supports the growth and health of beneficial microbes and funguses
Easily the most cost-effective way to improve your soil
Helps plants to be more robust and thus able to outperform damage from potential pests and diseases
Holds and distributes moisture and nutrients more effectively than soils that are too heavy in clays or sand
I’ll be covering a different method of composting in each upcoming newsletter. Today, let’s start with one of the easiest (and one of my favorites): The Pile Method

Note: You do not need a bin or any other sort of contraption for this method. Find a space on the ground and pile!
CHOOSE YOUR LOCATIONS
Identify what areas of your yard are suitable for composting use. Aim for a balance of being not so far from your house that it’s inconvenient to add to it, but not so close that you have to smell it on rainy days.
Though not essential, choosing a sunny location is beneficial in that it will help speed up the decomposition process. Compost likes it hot and can reach temperatures up to 160F.
Ideally, you’ll have two compost locations available– one location you will be actively adding to for a few months. Then, you’ll start a new compost location while the older pile is in the aging and breaking down phase with no new organic matter added. Once you use the compost from your first pile, start aging your second pile and begin adding organic matter to your first location once again.
ADD THIS/NOT THAT
Do add: kitchen scraps from your fruits and vegetables, coffee grounds, egg shells, tea bags, and compostable (non-glossy) paper products.
Also add: yard waste from plant cuttings, small branches, leaves, mulch, bedding and waste from livestock (or other herbivores) and chickens.
Do not add: meat, dairy, oils or other discarded food items, glossy paper, plastic, metal, cat litter.
MAKE YOUR COMPOST HAPPY
Stir to aerate with a pitch fork or tractor, depending on the size of your pile. For the love of your back, please do not try doing this with a shovel!
Water compost every other week (in the absence of rain) to speed up the breakdown process. While you’re watering, it’s a great time to stir in new additions to the pile.

QUESTION: How do I know when I can use my compost?
ANSWER: Depending on conditions, your compost will take anywhere from 4-12 months to be ready. If you’re in a warmer climate and have been aerating and watering, you’ll be able to use it much more quickly than if you use the “set it and forget it” approach (though decomposition will still happen). Use it when there are no longer any large pieces of matter and it resembles nice black soil. Some people choose to sift their compost thru some hardware cloth before use, but I haven’t found this to be necessary.
QUESTION: I’m scared of attracting rodents and other scavengers to my compost. How do you keep them away?
ANSWER: Dress up like an owl and dance outside the bin. Kidding. Try these four tips instead:
Bury your new food additions in the pile instead of adding them on top
Don’t add meat, dairy, or breads to your compost
Don’t over-water or add too many wet ingredients at once
Adopt a needy feral barn cat or three… #nobodyiscounting
QUESTION: My compost doesn’t seem to be breaking down. What’s up?
ANSWER: If your pile seems dry, add water and turn it to aerate and speed up the decomposition. Also, try adding more “green” ingredients like fruit and veggie scraps, animal droppings and fresh garden clippings and less “brown” ingredients like dry leaves and paper.
QUESTION: My compost smells terrible and rotten.
ANSWER: Well compost by nature is decomposing plant and animal waste so it will have some smell by design. I will be addressing alternative composting methods in each newsletter moving forward that will be more small-space friendly. Other ways to decrease the smell of your compost is decrease the wetness of it by adding more “brown” ingredients.
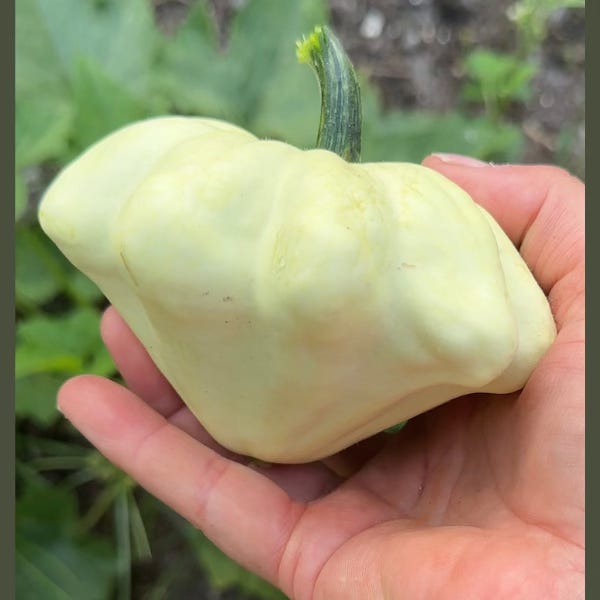
May & June Seed Starting for Zone 9 Gardens
Even as we approach the heat of summer, there are so many fantastic plants that you can start from seed or cuttings now. And if I’ve made a video about it, it’s linked here for your binging-learning pleasure.
Amaranth | Beans | Borage | Cassava
Cherry tomato | Corn | Cranberry hibiscus
Gingers | Herbs as companion plants or for seed
Katuk | Luffa | Malabar spinach | Marigolds
Mexican sunflower | Okra | Passion fruit
Peanuts | Peppers | Pumpkins | Roselle
Southern peas | Squashes | Sunflowers
Sweet Potatoes | Turmeric
*Now is also a great time to transplant fruit trees (read more on this below)
Want to make planting easier? Here are the seed starting tools I use from my Amazon store.
Time to Transplant: Fruit Tree Edition
Summer is the perfect time to get your fruit trees out of buckets and into the ground. Check out my TikToks on my recent fruit tree additions: champagne loquat, sherry loquat, jaboticaba and strawberry tree.

Choose a location that gets the appropriate amount of sun for your specific tree. Most fruit trees prefer full sun, but not all do. Miracle fruit and jaboticaba are just a few of the varieties that do well with some shade.
Plan to transplant later in the day when the temperatures aren’t so intense.
Dig a hole that is 4x the width of the pot and twice as deep. Doing so loosens the soil so that the roots have an easier time expanding into their new home.
Carefully remove the tree from its pot and loosen the roots well.
Backfill the hole with 1/2 native soil you removed and 1/2 compost.
Test the soil and adjust the soil pH if needed. Some trees may prefer more acidic or basic soil than your native soil might be.
Only bury the tree as deep as the top of the roots. You want the top of the roots to be barely covered with soil.
Add additional native soil as needed and top with 1 inch of mulch. Be sure to leave space between your mulch and the trunk of the tree, as mulch touching the trunk can trap moisture next to the trunk and can cause fungal issues.
Water deeply at time of planting (most new gardeners underwater, so if you’re new add more water than you think it needs). Continue watering several times per week and then as needed for the next 2-3 weeks or until the plant is established.
Keeping Your Chickens Cool for the Summer
I’m not saying you have to play Demi Lovato music while you do these things, but it can’t hurt.

Provide two layers of shade: If possible position chicken coops under a shade tree or shade cloth.
Increased ventilation: Open any screened windows and potentially add a fan if possible. Note: It’s important to keep chicken fans clear of dust and debris to not create a fire hazard.
Ensure they have cool, clean water to drink.
Let them free range: Free ranging allows your birds to choose breezy, shady, comfortable locations for themselves as the day goes on.
Fill a kiddie pool with cool water. Let chaos ensue.
Freeze a gallon of water and set it out in the shade for them to cuddle up to.
Add some of their favorite treats to ice cubes or blocks for a cooling enrichment activity.
Breed Choice: Chickens with large single combs tend to be more heat tolerant as their combs help them to release excess heat.
C U Next Tuesday
Will this help your garden? Doubtful. Will you be thoroughly entertained? Probably. These are my stories of the absurd, incorrect, and downright scammy things floating around the homesteading internet.
Bizarre Belief: You can sex chicken eggs before they hatch.
Each and every year, several people contact me looking for “female only hatching eggs.” Some of these conversations are easier than others, as you can imagine. The responses I get range from, “Thank you for letting me know! I would have gotten scammed otherwise!” to people arguing and angry that I must by lying to them so I can force them to buy my unwanted “male hatching eggs.”
Truth Be Told:
While there is a method to determine the gender of a chick in the egg with about 80% accuracy after about 8 days of incubation via measuring the VOC’s released thru the egg by the chick using Mass Spectrometry/Gas Chromatography, there is no way a breeder can ethically sell someone unincubated “female only” hatching eggs under any circumstances. If someone is selling female hatching eggs, they are a scammer. Period.
Friendly reminder that if it sounds too good to be true, then it probably is. Save yourself the frustration, go with only reputable breeders, and don’t buy from any place that guarantees the sex of your chicken eggs or the yolks on you!
From My Kitchen to Yours

2 cups cassava flour
1/2 teaspoon xanthan gum
3 Cavendish bananas or 6 Manzano bananas
4 eggs
3/4 cups sweetener of choice (I prefer honey or brown sugar)
1/2 cup avocado oil, melted tallow, or melted butter
1 teaspoon vanilla extract
2 teaspoons baking powder
3/4 teaspoon baking soda
1 Tablespoon lemon juice
1/2 teaspoon freshly ground cinnamon
Optional: ¼ to ½ cup nuts or seeds. My favorites include sunflower seeds, walnuts and pecans.
Move rack to center position in oven and preheat to 350°F.
In a large bowl mix together all wet ingredients (mashed bananas, eggs, sweetener, oil/butter, vanilla, and lemon juice).
In a medium bowl mix together all dry ingredients (flour, xanthan gum, baking powder, baking soda, cinnamon).
Mix the dry ingredients into the wet ingredients until blended. Avoid overmixing.
Optional: Fold in nuts/seeds or save for topping in the next step.
Oil a loaf pan or line it with parchment paper and fill with mixture.
Bake for 65 to 75 minutes or until a toothpick into the center comes out clean.
What’s In the Next Edition?
Here’s what’s coming to your inbox on June 1:
Composting within your garden beds
Pest treatment and prevention
Fruit tree maintenance
Another favorite recipe from my kitchen
What did you love? What did you learn? What questions do you still have? Comment below and maybe you’ll be featured in a future newsletter.
Thanks so much for the info! I’m already loving this.
Although, I have a small worm composter, but I think the information is still helpful!
I can’t wait to try that recipe!!!