


HUGE September Planting Guide: What to plant, how to plant it, recipes, pest ID & more
Edition 8: September 2024


In this newsletter:
Your September Planting Guide
What to Direct Sow vs Seed Start
My Updated Soil and Fertilizer Recipes
Companion and Trap Plants
What the Bleep is This, Bree?- Asian Lady Beetles
C U Next Tuesday- The Toxic Truth
Honey Marshmallow Recipe for the Holidays

(aka The Zen Hen) Welcome to my football season, my World Cup, my Olympic Games— Fall Planting in Zone 9! This is the time of year that look forward to getting so many of my favorite plants in the ground, knowing that in a few weeks and months, I’ll be enjoying the fruits of another well-rooted harvest.
People often ask on my TikTok why I go through the effort of growing my own food when it’s sometimes cheaper and easier (but peoply-er) to go to the grocery store. Nutritional density, taste, environmental impact, and pesticide-free food aside, I’ve found that most people who love to grow understand that the benefit of it goes beyond putting food on the table. Without gardening, I would never have learned how intoxicatingly amazing the flowers on papaya and grapefruit trees smell. Without gardening, I wouldn’t have realized the complex ecosystem and variety of organisms that are all around me.
Living in Florida, people complain that we have no real seasons besides hot and hotter. Through gardening, I am so much more tuned in to the changes in the weather and the growing cycles of nature. We gardeners notice so much more that the rest of the world seems to miss out on.
All that to say, I am here cheering you on in all my gardening fan gear as we get ready for one of the best times to plant in Zone’s 8-10
September’s Planting List Is Here!
If you love visuals, check out this video I made a few years back. More videos are linked to their related crop below.


Amaranth | Beans | Beets | Carrots
Brassicas (broccoli cauliflower, kale, mustard greens, bok choi, etc)
Celery | Chickpeas | Corn
Cucumbers | Eggplant | Fennel
Flowers (borage, nasturtiums, marigolds, etc)
Garden huckleberry | Garlic* | Ginger & Turmeric**
Herbs (basil, oregano, rosemary, parsley, etc)
Lettuces | Okra | Onions***
Peas | Peppers | Potatoes (Yukon Gold & Red Pontiac)
Pumpkins | Radishes | Saffron**** | Strawberries
Spinach | Squashes (Summer & Winter) | Swiss Chard
Tomatoes | Turnips | Watermelons & other melons
*Buy soft-neck garlic varieties now and store them in your fridge to plant in November.
**Start the rhizomes now. They will establish and then go dormant for winter.
***You can plant bunching and non-bunching onion varieties.
****This is a great addition to your Holiday Gift Baskets!
Direct Sow vs Seed Starting
Direct Sow foods (meaning seeds are planted in their final growing destination) follow a general rule of thumb; if we eat the roots they should be directly sown. There are a few exceptions to that rule that you’ll see listed below. Here’s my direct sow list:
Roots: carrots, radishes, turnips, beets
Vining: pumpkins, cucumbers, watermelon, beans
Others: corn, nasturtiums, lettuce, mustard greens
Note that beans and squashes including pumpkins will benefit from soaking overnight or up to 12 hours in water before planting.
Prestart in soil blocks (or starter pots):
Tomatoes- these benefit greatly by being transplanted deeper than their pot depth to increase root structure. They are one of the few plants that benefit from this.
Garden huckleberries and brassicas (broccoli, cauliflower, etc) do well when started in soil blocks and transplanted later.
Soil Recipes
If you want a well-rooted harvest, your soil quality is key. If you can avoid buying the bagged stuff from stores, please do and make your own. If you have extra, store it in a bin with a lid and use it during the next growing cycle. Note— this section includes affiliate links of products that I do actually use. If you buy it from these links I receive a small commission which helps support my farm.
Also, to reduce dust exposure when making these either pre-dampen all ingredients or wear a mask. Like my wise aunt always used to say, “Safety third!”


UPDATED Seed Starting Fertilizer Mix
4 parts Azomite
2 parts Green sand
1 part blood meal
1 part bone meal
2 parts biochar
Mix the above fertilizer mix and add it to your soil OR…
Seed Starting Soil Recipe
1 small (1.4 lb) block of coconut coir (expands to about 2 gallons)
1 Gallon Fine Compost or Worm Castings
3-4 Cups Perlite
3-4 Cups Vermiculite
1/2 Cup Seeds Starting Fertilizer mix (recipe below or also available in my bio/linktree)
Bulk Recipe:
10 lb block coconut coir
10 gallons of fine compost or worm castings
2 gallons of perlite
2 gallons of vermiculite
(Optional) 4 cups of the natural fertilizer mix above
Get yourself a large bin or wheelbarrow.
Wet the coco coir until it’s damp and crumbly. This will take more water than you think it will!
Mix in the remaining ingredients.
For my visual learners, you can watch this video to see it done.
Refresher Course: Trap Plants & Companion Plants
If you’re a newer subscriber, welcome. You may have missed my previous editions about trap plants (ones that alert you to pests in the area first) and companion plants (ones that will help deter pests and support growth). Here are my favorite items to co-plant this season.
Companion plant your garden with trap crops (sacrificial crops). Trap crops work best when they receive a 2-4 week head start before the plants they are protecting. I like to place trap crops ideally 5 and 15 feet away so they are nearby but not too close.
Mustard Greens for pests on your brassicas (kale, broccoli, cauliflower, Brussels sprouts, mustard greens)
Garden huckleberry for all pests on your nightshades (tomatoes, peppers, eggplants, etc)
Blue Hubbard Squash and Scalloped Squash for pests on your cucurbits (squash, pumpkins, cucumbers, melons)
Amaranth for armyworms
Hibiscus, blue butterfly pea, and milkweed for aphids
Radishes and mustard for flea beetles
Use strong-smelling companion plants to surround your crops as a deterrent. My favorites include:
Alliums: chives, onions and garlic
Strong-smelling herbs: oregano, thyme, culantro, cilantro, rosemary, sage, etc
Marigolds (These do double duty by also interrupting the life cycle of root-knot nematodes in the soil)
What the Bleep Is THIS, Bree?
On social media, one of the things I’ve tagged in most is pictures of people’s gardens. And generally, the commentary is not, “Hey, check out my amazing garden!” It’s more like, “@ZenHen WTF is this thing? Is it good or bad? Do I hug it or kill it?”
Hence this new section where I’ll post things you may see around your garden and what to do about them.
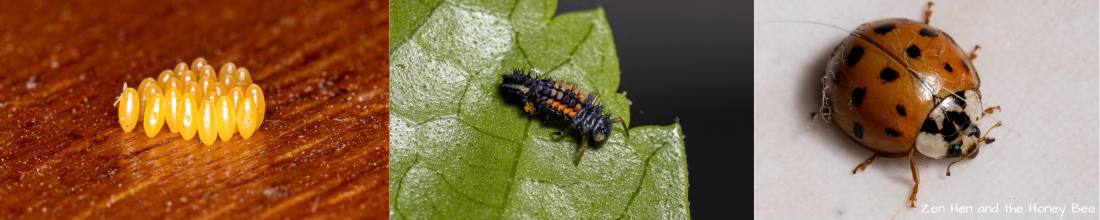
Who’s That Lady? It’s certainly not the ladybugs that all gardeners know and love. No, my friend, these are Asian Lady Beetles. There are many strongly held beliefs from gardeners as to whether these creatures are beneficial or pests, but I’m going to give you my take and let you decide.
But first, how do you know if you have a ladybug or an Asian Lady Beetle? The Asian Lady Beetles have what looks like a black “M” on their thorax, where their head meets their wings. They may also be more orange or yellow.
The Good: Asian Lady Beetles, while considered an invasive pest, are still considered an important part of US agriculture in their ability to control the aphid population. That’s right! These beetles feed on the same garden pests as those ladybugs you contemplated buying in bulk.
The Bad: They are invasive, they eat the same food supply as ladybugs, and they have no known predators. Also, they can bite.
The Really Bad: When temperatures drop, these beetles love to head indoors and are known to be a real pest when they take up residence in your home’s walls, attic, or crawl spaces. They can be a challenge to get rid of, but your pest company or some DIY treatments are available.
Verdict: They are not a cause to panic and have become a part of the US agricultural ecosystem. So unless they’re in your home, it’s best to let them fly.
C U Next Tuesday
Will this help your garden? Only occasionally. Will you be thoroughly entertained? Probably. These are my stories of the absurd, incorrect, and downright scammy things happening in the homesteading world.
The Dirty Truth About “Cleaning Hacks”
I’m a biochemist. I know, interesting way to start a life raising chickens and homesteading, right? Being on the homesteading side of social media algorithms I come across a lot of DIY recipes. The hacks that give me the strongest biochemist side eye are often natural cleaning products.
In one video, a woman shared how she mixed two ingredients together and voila, she had a natural cleaning spray. Unfortunately, she did realize that her concoction would also create a toxic gas that could be harmful to her and her pets. I sent her a DM to notify her and offered some other possible solutions that weren’t quite so deadly.
The moral of the story is that when it comes to mixing chemicals for cleaning or personal care products, please make sure you’re getting your recipes from a reputable source.
From My Kitchen to Yours

Ingredients:
Marshmallow Recipe Honey Recipe:
1 cup honey
3 Tbs unflavored gelatin
Water
1/2 -1 Tbs vanilla extract
Pinch of salt
Starch for dusting to prevent sticking. (I use tapioca flour, but corn starch also works).
Instructions:
In a bowl or stand mixer add the gelatin and 1/2 cup of water. Mix together until dissolved.
In a saucepan add honey and 1/4 cup water and salt. Bring to a rolling boil for 3 minutes then remove from heat.
With medium mixing speed, slowly add the hot honey syrup to the gelatin mixture. Then add in vanilla or other extract.
Turn the mixer speed up to high and mix until the marshmallow cream is very fluffy (7-10 minutes).
Sprinkle an 8x8 or 9x9 pan with starch or cover with parchment paper and pour the mixture into the pan. Allow the marshmallow to cool completely.
With a sharp knife dusted with more starch, cut the marshmallows into pieces. Dust individual marshmallows with more starch to prevent sticking and store in an airtight container.
HOLIDAY GIFT BASKET TIP: This is a recipe that I love experimenting with. While you’ll want to make your marshmallows close to the time you’re planning to gift them, I recommend doing a few practice rounds. You can play around with adding extracts or coating one side with crushed candy cane. Plus, this experiment is delicious!

What questions do you have? Drop a comment below and let me know.
Bree, have you stopped doing the Well Rooted Harvest newsletter? I received a refund and stopped getting your emails.